
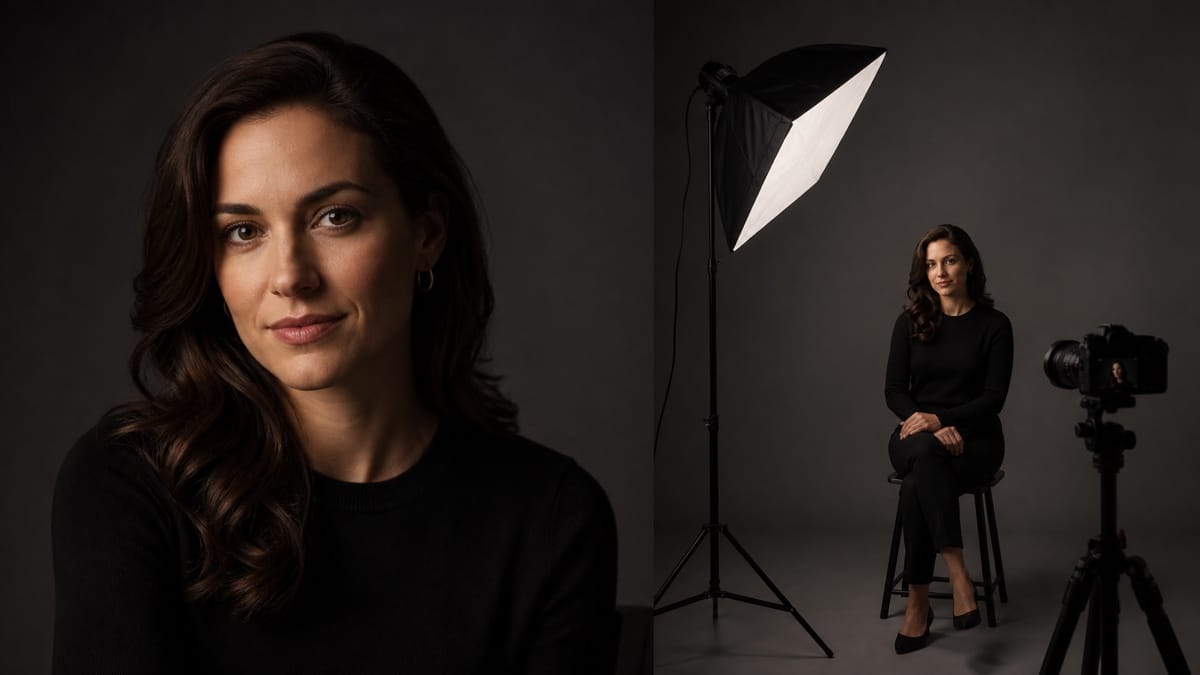
Mastering One-Light Portrait Photography: Techniques and Setups
One-light portrait photography is one of the best ways to learn what light actually does. With a single flash, strobe, LED, or other continuous light—and careful control of its position, size, distance, and angle—you can create everything from soft beauty portraits to dramatic, shadow-filled character studies.
Working with one light removes unnecessary complexity. Instead of wondering which of several lights is causing a problem, you can concentrate on the relationship between the light, the subject, and the camera. You learn to recognize good catchlights, control nose and cheek shadows, create facial dimension, and make deliberate choices instead of guessing.
In this guide, you’ll learn seven dependable one-light portrait setups, where to position the light, what to look for on the face, which mistakes to avoid, and how to practice every setup with one subject.
Why Every Portrait Photographer Should Master One Light
A complicated lighting setup is not automatically a better lighting setup. Adding more lights also adds more variables: power, direction, color, spill, reflections, shadows, and exposure all become more difficult to control.
One light gives you a cleaner learning environment. You can move it higher or lower, bring it closer or farther away, change its angle, add a modifier, and immediately see how that single change affects the portrait.
Mastering one light teaches several essential skills:
- How light direction shapes a face
- How modifier size affects shadow softness
- How light distance affects exposure and falloff
- How to create facial dimension
- How to control catchlights
- How to separate a subject from the background
- How to recognize and correct common lighting problems
Once you understand these principles, adding a second or third light becomes much easier. You are no longer adding lights to rescue a weak setup. You are adding them for a specific purpose.
Essential Equipment for One-Light Portraits
You do not need an expensive studio full of equipment. A practical one-light portrait setup can be created with the following items.
Camera
Any camera that allows you to control exposure can work. A DSLR or mirrorless camera makes it easier to work with off-camera flash, but a compact camera can also be used with continuous lighting if it provides suitable exposure controls.
Portrait Lens
A 50mm or 85mm lens is a popular choice on a full-frame camera. On a crop-sensor camera, a 35mm or 50mm lens can provide a similar working perspective.
The focal length matters less than your camera position. Avoid working so close that facial features become distorted.
One Light Source
Your light can be:
- A speedlight
- A studio strobe
- A battery-powered location flash
- An LED light
- Another continuous light source
Flash offers more power and can help freeze movement. Continuous light lets you see the lighting pattern before pressing the shutter. Both can produce excellent portraits.
Light Stand and Trigger
A sturdy light stand allows you to position the light independently of the camera. If you use flash, you will normally need a compatible wireless trigger or sync connection.
Light Modifier
A softbox or umbrella increases the apparent size of the light and helps create softer, more controlled shadows. A grid can be added when you need to restrict spill and keep light off the background.
Reflector
A white or silver reflector can return some of the main light into the shadow side of the face. Because it does not produce light, it can be used while still maintaining a true one-light setup.
Sandbag
Always stabilize the light stand with a sandbag or suitable weight. This is especially important when using a large softbox, working outdoors, or photographing children and pets.
Understanding the Fundamentals of Portrait Lighting
Before learning individual setups, it helps to understand the principles that make those setups work.
Light Direction
The direction of the light determines where highlights and shadows appear.
Light close to the camera position produces flatter illumination with fewer visible facial shadows. As the light moves farther to the side, shadows become more prominent and the face gains dimension. At approximately 90 degrees to the subject, the light can divide the face into distinct illuminated and shadowed halves.
There is no single correct direction. The goal is to choose a direction that supports the subject, expression, and intended mood.
Apparent Light Size and Softness
A large light source relative to the subject creates gradual transitions between highlights and shadows. This is commonly described as soft light.
A small light source creates sharper shadow edges and greater contrast. This is commonly described as hard light.
The word “relative” is important. A medium softbox placed close to the subject appears larger and produces softer light. Move that same softbox farther away and it appears smaller, producing more defined shadows.
Distance and Light Falloff
Light becomes less intense as it travels away from its source. According to the inverse-square law, doubling the distance between the light and the subject reduces the illumination to approximately one-quarter of its previous intensity.
A light positioned close to the subject produces rapid falloff. The illuminated side of the face may be noticeably brighter than areas farther from the light, and the background can become dark if it is sufficiently far behind the subject.
Moving the light farther away and increasing its power creates more even illumination across a larger area, although the light will also become harder unless a larger modifier is used.
Subject-to-Background Distance
Moving the subject farther from the background provides greater control.
More distance can:
- Reduce visible background shadows
- Make the background appear darker
- Create a greater feeling of depth
- Help separate the subject from distracting background details
Placing the subject very close to the background usually makes it brighter and increases the likelihood of visible shadows falling across it.
Catchlights
Catchlights are reflections of the light source in the subject’s eyes. They give the eyes shape, dimension, and life.
Their position also provides useful information about your lighting. Catchlights near the upper portion of the iris usually suggest a natural-looking light direction. If the catchlights disappear, the light may be too high, too far to the side, or blocked by the brow.
Seven One-Light Portrait Setups to Master
The following setups can all be created with one powered light. Begin with the recommendations, observe the face carefully, and make small adjustments for each subject.
1. Loop Lighting
Loop lighting is one of the most versatile and flattering portrait lighting patterns. It creates a small nose shadow that points downward and slightly toward the shadow side of the face.
Light placement: Position the light approximately 30 to 45 degrees to one side of the camera and slightly above the subject’s eye level. Angle it downward toward the face.
What to look for: The nose shadow should form a small loop without connecting to the cheek shadow. Both eyes should normally have visible catchlights.
Best for: Headshots, senior portraits, families, children, business portraits, and general portraiture.
Common mistake: If the nose shadow becomes long or connects with the cheek shadow, the light is probably too far to the side or too high.
Quick lighting recipe: Place a medium softbox 2 to 4 feet from the subject, approximately 35 degrees to one side, and slightly above eye level. Adjust its position until the nose shadow forms a clean, compact loop.
2. Rembrandt Lighting
Rembrandt lighting creates a distinctive triangle of light on the shadowed cheek. It adds depth, mood, and a painterly quality to a portrait.
Light placement: Begin with the light approximately 45 to 60 degrees to one side of the subject and above eye level. Angle it downward.
What to look for: The nose shadow should connect with the cheek shadow while leaving a small illuminated triangle beneath the eye on the shadow side. The triangle should not extend much wider than the eye or much lower than the nose.
Best for: Dramatic portraits, editorial work, character studies, musicians, artists, and subjects who benefit from strong facial dimension.
Common mistake: If the illuminated triangle disappears completely, the light may be too far to the side, too high, or the subject may be turned too far away.
Quick lighting recipe: Position a softbox about 45 degrees to the side and raise it until the nose shadow meets the cheek shadow. Ask the subject to make very small head turns until the triangle appears beneath the shadow-side eye.
3. Butterfly Lighting
Butterfly lighting receives its name from the small, symmetrical shadow it creates beneath the nose. It produces clean facial symmetry and emphasizes cheekbones.
Light placement: Position the light directly in front of the subject and above the camera. Angle it downward toward the face.
What to look for: A centered butterfly-shaped shadow should appear beneath the nose. Shadows beneath the cheekbones and chin should remain controlled, and both eyes should have catchlights.
Best for: Beauty portraits, fashion, glamour, clean headshots, and subjects with balanced facial features.
Common mistake: Raising the light too high can create dark eye sockets and an excessively long shadow beneath the nose.
Quick lighting recipe: Center a large softbox above the camera and raise it until a small symmetrical nose shadow appears. If the eyes become dark, lower the light until the catchlights return.
4. Clamshell Lighting With One Light
Traditional clamshell lighting is sometimes created with two powered lights, but an excellent one-light version uses one light above the face and a reflector below it.
Light placement: Place the main light directly in front of and above the subject, similar to butterfly lighting. Position a white or silver reflector beneath the subject’s face, angled upward.
What to look for: The main light creates shape from above while the reflector opens the shadows under the eyes, nose, lips, and chin. The eyes should appear bright and lively.
Best for: Beauty portraits, close headshots, cosmetics, fashion, and flattering portraits with clean skin tones.
Common mistake: A silver reflector placed too close can produce unnatural upward lighting or overly bright reflections beneath the chin.
Quick lighting recipe: Place a large softbox above and slightly in front of the subject. Hold a white reflector around chest level and angle it upward until the lower shadows become softer without disappearing completely.
5. Short Lighting
Short lighting refers to which side of the face receives the main light. The side turned away from the camera—the visually narrower or “short” side—is illuminated.
Short lighting can be combined with loop or Rembrandt lighting.
Light placement: Turn the subject’s face slightly away from the camera. Position the light so it illuminates the side of the face farthest from the camera.
What to look for: The broader side of the face, closest to the camera, falls into shadow. This creates dimension and can make the face appear narrower.
Best for: Dramatic portraits, classic portraiture, rounder faces, and situations where you want depth and visual sculpting.
Common mistake: Turning the subject too far can hide the illuminated cheek or remove the catchlight from the far eye.
Quick lighting recipe: Turn the subject about 20 to 30 degrees away from the camera. Place the light on the far side of the face and adjust until both eyes remain visible and the far cheek is properly illuminated.
6. Broad Lighting
Broad lighting is the opposite of short lighting. The side of the face turned toward the camera—the visually broader side—is illuminated.
Like short lighting, broad lighting can be combined with loop or Rembrandt patterns.
Light placement: Turn the subject slightly away from the camera and place the light on the side of the face closest to the camera.
What to look for: The camera sees more of the illuminated side and less of the shadowed side.
Best for: Narrow faces, bright commercial portraits, energetic expressions, and situations where you want a more open appearance.
Common mistake: Broad lighting can make a face appear wider or flatter when the light is positioned too close to the camera axis.
Quick lighting recipe: Turn the subject approximately 20 degrees away from the camera. Place the light 30 to 45 degrees toward the camera-facing side and adjust the subject’s chin until the result looks open without becoming flat.
7. Split Lighting
Split lighting places one side of the face in light and the other in shadow. It creates a bold, dramatic portrait with strong contrast.
Light placement: Position the light approximately 90 degrees to the subject, near face level or slightly above it. A grid or narrow modifier can help prevent spill.
What to look for: The center line of the face should separate the illuminated and shadowed sides. Depending on the desired mood, you may allow a small amount of light to reach the shadow-side eye.
Best for: Character portraits, athletes, performers, editorial images, and other portraits requiring mystery or intensity.
Common mistake: If too much light spills across the front of the face, the split effect disappears. If the subject turns too far away, the shadow-side eye may become completely lifeless.
Quick lighting recipe: Place a gridded softbox directly beside the subject. Start at 90 degrees and then move the light or turn the face by a few degrees until the shadow-side eye has the desired amount of detail.
Starting Camera Settings
Camera settings depend on the strength of the light, modifier, distance, ambient conditions, and desired depth of field. The following settings are starting points, not universal rules.
Starting Settings for Flash
Try:
- Manual exposure mode
- ISO 100
- 1/160 second
- f/5.6
- Flash around 1/16 power
Make sure your shutter speed remains at or below your camera’s normal flash synchronization speed unless you are intentionally using high-speed sync.
Adjust the flash power or light distance to control the brightness on the subject. Aperture and ISO also affect flash exposure. At normal synchronization speeds, shutter speed primarily controls how much ambient light appears in the photograph.
Starting Settings for Continuous Light
Try:
- Manual exposure mode
- ISO 400
- 1/200 second
- f/2.8 to f/4
- A fixed white-balance setting appropriate for the light
Increase the ISO if more exposure is needed. Avoid lowering the shutter speed so far that subject movement creates blur. For an active subject, 1/200 second or faster is a useful starting point.
After every lighting change, check the subject’s skin highlights, histogram, focus, and catchlights. Do not rely solely on the brightness of the camera’s rear screen.
Troubleshooting Common One-Light Problems
The Shadows Look Too Harsh
Move the modifier closer to the subject, use a larger modifier, add diffusion, or feather the light across the face. Reduce the light’s power after moving it closer.
The Portrait Looks Flat
Move the light farther away from the camera axis so the facial shadows become more visible. You can also turn the subject’s face slightly away from the light.
The Eyes Have No Catchlights
Lower the light, move it slightly toward the camera, or ask the subject to adjust the angle of the head. Make sure the light is not being blocked by the subject’s brow.
Eyeglasses Show Bright Reflections
Raise the light and angle it downward, move it farther to the side, or make a small adjustment to the subject’s head. Watch the reflections through the camera while moving the light. A small change can remove the glare without changing the entire lighting pattern.
One Side of the Face Is Too Bright
Feather the modifier so its center is aimed slightly in front of the subject rather than directly at the face. You can also move the light farther away and increase its power to create more even illumination.
The Background Is Too Bright
Increase the distance between the subject and the background. Move the light closer to the subject, reduce its power accordingly, and use a grid or flag to prevent spill.
The Background Shadow Is Distracting
Move the subject farther from the background, raise or reposition the light, or change its angle so the shadow falls outside the camera’s composition.
The Subject Keeps Moving Out of the Light
Use a larger modifier, move the light slightly farther away for broader coverage, mark the subject’s position on the floor, and provide clear instructions about where the face should remain.
A Seven-Shot One-Light Practice Exercise
The fastest way to understand these techniques is to photograph them deliberately.
Choose one subject, one light, one modifier, and a simple background. Keep the camera position as consistent as possible and create these seven photographs:
- Loop lighting
- Rembrandt lighting
- Butterfly lighting
- One-light clamshell lighting with a reflector
- Short lighting
- Broad lighting
- Split lighting
After every photograph, examine:
- The position of the catchlights
- The direction of the nose shadow
- The cheek and jawline shadows
- Detail in the shadow-side eye
- The brightness of the background
- The subject’s expression
- Whether the light supports the intended mood
Change only one variable at a time. If you change the light height, distance, modifier, subject position, and camera settings simultaneously, it becomes difficult to understand which change produced the result.
The purpose of the exercise is not simply to make seven attractive photographs. It is to teach your eyes to recognize exactly how one light shapes a face.
Final Thoughts
One light gives a photographer nowhere to hide—and that is exactly why it is such an effective teacher. When the portrait succeeds, you can identify what made it work. When it fails, you have a manageable number of variables to examine and correct.
Practice these seven setups until you can recognize their shadows and catchlights without needing a diagram. Then begin adapting them to different faces, expressions, clothing, backgrounds, and creative goals. The setup is only the starting point. The photographer’s observation and judgment create the finished portrait.
If you would like feedback on your one-light portraits, additional photography education, or the opportunity to learn from photographers with a wide range of experience, join the Pro4uM professional photography forums. Share your results, ask questions, study the work of other photographers, and use the community to make your next portrait stronger than the last.